Wednesday, September 18, 2013

Waiting for a Sign

I've been waiting for a sign.


No, not that sign.  This sign.
Yes, the weather is about to change! Will we get rain? I sure hope so.  Looks like the chances are pretty good, and look at the shift in the temperatures. It's still plenty hot, but I see some 80's.  It's starting to look like fall.  I'm taking this as a sign that it is time to plant the winter vegetable garden.

I've been preparing for the winter garden since August when I started lettuce, chard and rutabaga seeds in the house. Those seedlings are coming along nicely.

Lettuce Seedlings
Chard Seedlings
For those vegetables that I generally don't grow from seed like broccoli and cabbage, I'll need to buy transplants. As soon as vegetable transplants are available in the nurseries, I pot them up in one gallon containers, so they can start building larger root systems. These little guys get only morning sun and a free wagon ride when they need a lift to a shadier spot.


I was getting a little impatient for a change in the weather, so I started my carrots on September 8th. In the warm soil, the seeds germinated in about 5 days.  Keeping the seeds moist is a challenge, but shade cloth helps to keep the soil from drying out too much.


I was excited to find some artichoke transplants back in August, so I snatched them up. They also went into the garden on September 8th with the assistance of shade cloth.


For more information on fall/winter vegetable gardening, please check out my appearance on the Central Texas Gardener where I recently appeared as the in-studio guest.

Another valuable resource for vegetable gardening is the Travis County Vegetable Garden Planting Guide.  Use this guide to help you determine the best time to plant the vegetables you love.
 
Happy winter gardening and don't forget the BT!  Those hungry caterpillars like those cooler temperatures and your tasty veggies.


Thursday, September 12, 2013

Don't Hug Your Cactus

Cactus need love too. Just don't hug them or love them too much. In my garden, love generally means fertilizer and water.  Since cactus don't need much of either, I suggest fluffing their gravel or just saying a friendly "howdy" as you walk by on your way to water some other more needy potted plant.


As we've struggled with the drought here in Central Texas, I've satisfied my desire to collect plants by adding more cactus.  I started thinking about growing cactus in all those tough spots where other plants just couldn't cut the mustard.

One of those tough spots is the western exposure of my house.  The space provides the harshest of environments; full on sun against a brick wall.  I've tried lots of different plants in this area over the years and nothing can quite stand up to the reflected heat of July and August.  Nothing until I planted cactus.  Even in pots these guys don't flinch.  I could have planted them in the ground, but the pots will provide some flexibility to move them out of the way when the AC repairman comes a calling.


Just a few feet from the AC unit temperatures moderate thanks to some nearby trees. These plants have it much easier.  In the pot pictured below, horse crippler, silver dyckia and echeveria are growing happily.  I added plenty of perlite to the potting mix to keep the soil well-drained and topped the pot with decomposed granite to make them feel right at home.


Until I recently met Mr. Bunny Ears, I would have said the dyckia was the most unhuggable of all the cactus-like plants. Dyckia are actually bromeliads with barbed hooks on their leaves that catch you both coming and going.  The spines are so sharp that a little routine maintenance will leave you looking like you just fought off a herd of wild felines.


One of the things I love about cactus and agave is their ability to add interest when combined with soft leaved plants. On the left, two agave parryi pups consort with the very slow growing Queen Victoria agave. The cool blue of the agave striata on the right works well with evolvulus glomeratus 'blue daze' in the tallest pot.


On the edge of a bed where sprinkler coverage is hit or miss, I added this little berm of gopher plant. While not exactly a cactus, euphorbia rigida is very drought tolerant and needs little water. Now if I can only keep the vitex trifolia 'purpurea' growing behind it from swallowing it whole.


My latest exciting acquisition is this manfreda 'silver leopard'. Sometimes called false agave or spice lily, this plant is very drought tolerant.  I purchased two of these little lovelies to replace some ill-fated bottle brush shrubs that never had a chance in this drought. 

Considerably more hugable than most cactus, silver leopard, also has more to love. Spreading by underground rhizomes, this colony forming plant will provide plenty of little friends, so you can spread the love around.


I know this drought is tough, so maybe it's time to embrace cactus in the garden.  Just don't hug them, and a little eye protection would probably not be a bad idea either.

Wednesday, September 11, 2013

Wordless Wednesday: The Summer Strainer

Has summer strained your gardening enthusiasm?  Fall is right around the corner.


Wednesday, September 4, 2013

Bunny Ears

Bunny ears are sweet, velvety and adorable.  You can't help but want to touch them.  So, what sort of sadistic person decided that a diminutive form of Opuntia cactus should be named for something so soft and cuddly.


I'm warning you.  Don't try to snuggle up to Opuntia microdasys also known as bunny ears cactus. It doesn't have spines, but it has a thorny part which is more insidious. On each of the pads are clusters of tiny glochids. These glochids seem to jump from the plant onto your skin and clothes.  If you've come in contact with them, you'll know it. Glochids are like a paper cut you can't quite see. The tiny barbs are very irritating to your skin. If you're lucky someone with good vision will help you remove them with a sharp pair of tweezers.


Apparently, Opuntia microdasys cacti are not named for the softer side of bunny ears, but rather for the fact that the pads grow in pairs; just like a bunny's ears.  Thank goodness someone on the web cleared that up for me.  I was really starting to wonder about these cactus growers.


I recently purchased two bunny ears for my cactus berm. Everything on my berm is growing fine without any supplemental irrigation except for my blackfoot daisy.  I don't want to drag a hose out to the berm location, so out with the daisy and in with more cactus.


While searching for my new berm inhabitants, I discovered two related opuntias that I decided to grow in containers.  The first, Opuntia microdasys 'albispina' is also known as polka dot cactus and the second, Opuntia microdasys 'rufida' is sometimes referred to as cinnamon cactus.


These Opuntia are cute, but I would definitely recommend handling with care. I know I won't be confusing these cactus with bunny ears any time soon.

Thursday, August 22, 2013

Razing the Roof

In October 2011, I was facing down the inevitability of another Texas winter. My tropical potted plant collection had grown to epic proportions, and I just couldn't face the idea of trying to squeeze all my plants into the house again. The previous winter plants filled every nook and cranny of my home and made it difficult at times to get to the back door. Yep, I'm not exaggerating. Something had to give.

I had been wanting to build a greenhouse for a long time, but I couldn't find the right plan.  I finally found a greenhouse plan on the Build Easy web site that I really liked, and a contractor who seemed to think he could build it. Here's a sample photo of what the Build Easy greenhouse plan looks like when constructed. 


The plan on the internet was for an 8 X 12 structure, but I needed something more in the 16 X 24 size.  The contractor extrapolated out the plan to the larger size and that's where everything took a wrong turn.  I should have hired an architect or engineer to create a new plan, but I did not. Hind sight is 20/20.

The greenhouse was completed in November 2011 just in time for the cold weather to arrive. Here's my blog about the completion: Greenhouse Build - Week Four.  I was pretty darn happy the day that project was completed, but that happiness was short-lived.


I had problems with the greenhouse immediately.  The clerestory windows did not come close to sealing shut. It soon became obvious that heating the greenhouse would be a huge challenge with these gaping holes.  As an emergency stop gap measure, we bought scads of foam air conditioning insulation and filled the cracks as best we could. As luck would have it, we had a very mild winter.

I didn't have the funds to pay someone to rebuild the greenhouse clerestory windows, so the next winter I decided to press my luck and hope for warm weather.  The winter wasn't too bad, and thank goodness, because things went from bad to worse.

By late winter 2013, the roof had started visibly sagging which prevented the middle clerestory window from closing at all.  The situation was pretty dire when I chanced to meet a friend of my husband's. This friend is very knowledgeable in the field of engineering, so I asked him if he could tell me what was going wrong with the greenhouse.  Ah, where to start...

There were 2 main problems: failure to properly size and install the roof beans, and failure to properly execute the installation of the windows in accordance with the original plan.

Since the building is larger than the original plan, the roof needed 2 X 6's instead of 2 X 4's, but the problem was compounded by the fact that the builder did not make proper use of the 2 X 4's.  See how all the beams have been shaved down to a little point.  With all the 2 X 4's standing on tippy toe, the roof supports are weakened. He might as well have used 2 X 2's.


After explaining all this to me, my husband's engineering friend offered to help us fix the greenhouse.  I was just hoping for a contractor referral, so this offer to help solve my problems thrilled me to no end.  My wonderful husband and his talented friend were going to fix my greenhouse for me. YAY! MY HEROES!

With construction underway, you can still see the visible sag of the roof.  Later they will use a jack to lift the roof back into position.


The windows will be reconstructed to retract flat against the building instead of stopping when they hit the roof.  In order to do this, the front roof will be lowered slightly and rebuilt with the 2 X 6's. Watching all this occur is pretty amazing.


Fortunately, I'm now in good hands.  I have every confidence that my greenhouse will be in tip top shape very soon.  It might not seem like it in August, but another winter will be here before you know it.

Friday, August 16, 2013

The Foliage of Croton

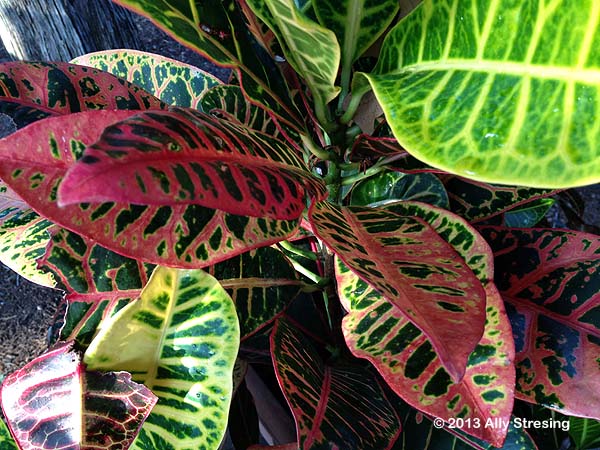
One of the things I love about living in Central Texas is the ability to grow houseplants outside for 8 months of the year. Given a little shade and regular water many houseplants thrive in our heat and humidity.  One of those houseplants is the humble and ubiquitous croton.

I originally purchased my crotons in spring 2011 for less than $5 a plant.  I intended to grow them as annuals, but they have overwintered nicely and are still going strong. They grow very quickly while enjoying the heat of a Texas summer. Here they are after growing for just one growing season.


Fast forward to spring 2013.  After a luxurious winter in the greenhouse, the crotons bask in the early morning light.  


These plants can take an amazing amount of sun for a houseplant. I have seen these plants displayed at big stores in way more sun then I give them at home.  I keep mine outside from April through November and then store them in the greenhouse for the winter at a night time temperature of about 40 degrees.  

If you're looking for brilliant patterns combined with greens, yellows, pinks and reds, then you'll love the easy going and beautiful croton.


For more great foliage ideas, check with Pam at Digging where you will find her foliage followup blog on Berkley Sedge.  Check her comments section for links to other interesting blogs about foliage.


Wednesday, August 7, 2013

Another Brick in the Wall

The impetus for building the wall was set in motion by a well-meaning home builder who planted coastal Bermuda grass.  When we moved into our house in 1992, the Bermuda was growing happily. 

Slowly we started eliminating the Bermuda in the front garden. Our goal was to replace it with a woodland themed garden filled with meandering paths and the sound of water.  When the Bermuda was under control in the front, our attention turned to the back garden where the Bermuda grew the thickest. 

Since we are on a septic system, we decided the one area we would allow the grass to grow was over the septic field. This grass doesn't get watered or fertilized. It gets mowed only occasionally, and for the most part requires little effort.

To separate the grass from the rest of garden we installed a dry stack wall.  This worked pretty well for many years. The Bermuda occasionally made incursions through the wall into the neighboring garden bed, but we just weeded it from time to time. 

As the years passed, I eventually started adding plants to the beds adjacent to the Bermuda grass. The new planting beds required irrigation and the Bermuda grass was all too happy to take advantage of that extra moisture. Our little dry stack wall was no longer capable of holding back those vigorous Bermuda runners.  

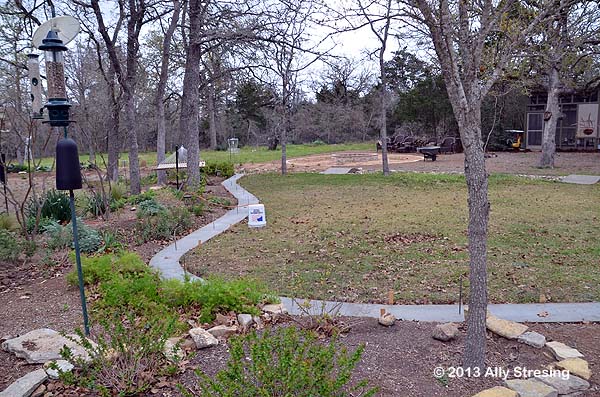
The picture below was taken in fall 2012. The dry stack wall has been removed, and we are beginning to make our plans and preparations for operation "Stop the Bermuda Grass".


In February 2013, we broke ground and started building the footing for the wall.  The trench was 87 feet long and 4-6 inches deep. After the trench was dug, bender board was used to form the walls.


In areas where the ground sloped away more sharply, gravel was added to save on concrete.


When the concrete was poured, the results reminded me of a great gray snake slinking through the grass.  The rebar posts sticking out of the concrete are tied in to steel mesh. This will give the wall more strength later when the cinder blocks are added.


The cinder blocks will form the center of wall.  Decorative bricks will be added to hide the cinder blocks later. We decided to use the same manufactured paver bricks that we used during our fire pit project.  Repeating materials helps unify a space.  At least that's what the garden design books say.


After the brick paver veneer was glued into place, we realized we had a little problem. The pavers were coming up a little too high, which was causing a gap under the cap stones. We'll have to deal with that problem later.  


With all this work going on there's never much time to mow, but looky here. The wall is already stopping the Bermuda. Yay!


So here's the solution to our earlier dilemma. We used cement backer board to fill the space at the top of the wall. Then, thin mortar was added to level everything out.


Ta da! Perfection! The top of the wall is now smooth and level. 


This small section of the wall is almost done.  The cap stone will be added later when the mortar is dry. I'm very excited to see the finished product.


Another brick in the wall and another brick closer to completion. I'll keep you updated on our progress.