Showing posts with label Recipes. Show all posts

Wednesday, February 22, 2012

Rutabaga Oven-Baked Fries

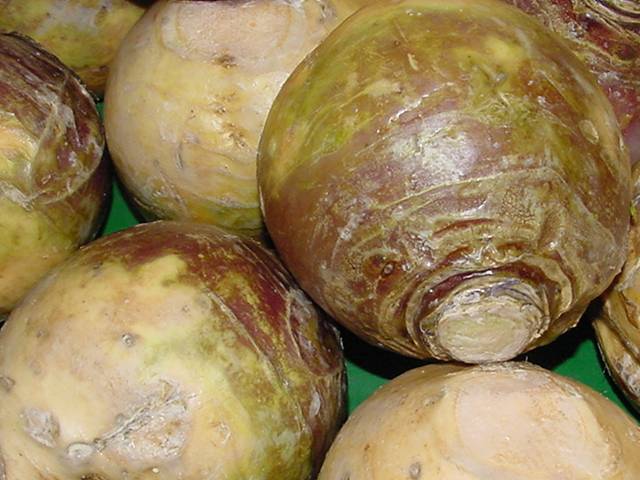
Rutabaga can be grown successfully in Texas, and the rutabaga from your garden will put those wax coated, grocery store rutabaga to shame.  In the grocery store, a rutabaga will look something like the picture below.  I think they coat them in thick wax to prolong storage.

A rutabaga from your garden will looking something like the picture below.  This rutabaga is called 'Purple Top'.  I guess you can see where it gets it's name. 

In order to be successful growing rutabaga, I have always started my seeds indoors around the July/August time frame.  The conventional wisdom is that root crops don't transplant well, but starting rutabaga seeds outdoors in the Texas summer, or even fall for that matter, is just not practical.  I start mine indoors and keep bumping them up until the temperatures cool and I can finally plant them.

Back in October 2011, I planted these little rutabaga transplants into the garden.  In the picture below, the rutabaga are under netting to protect them from the local wildlife.  Due to the severeness of our drought at the time, the birds were eating any seedlings they found in the garden.

I harvested my first rutabaga in December shortly after we had our first freeze.  It was pretty tasty, but rutabaga flavor only improves when the temperatures get colder.  The plants can get quite large and by February the rutabaga are as big as honeydew melons.

 When a rutabaga is lifted from the ground, the top foliage and the roots can be cut away with a knife.


Friends always ask me, "What do you do with a rutabaga?"  My favorite preparation (see mashed rutabaga)  is to cut the rutabaga into pieces and boil until they are soft.  Then, I mash the softened rutabaga with butter, salt and pepper.

Rutabaga are tasty in beef stew or with pot roast.  Basically, any time you're serving potatoes and carrots, rutabagas will fit right into the menu.  

I have a garden full of rutabaga, so I've been on the lookout lately for some new rutabaga recipes.   I saw several recipes on the internet for rutabaga oven-baked fries, so thought I would give that a try.  

To prepare the fries, cut the rutabaga into 1/2 inch slices and thoroughly cut away the outer peel. 

Cut the slices into strips that resemble hand-cut french fries, and drizzle the fries with olive oil.  Bake at 425 degrees for 12 minutes or until the fries are tender when pierced with a fork.  


The fries will be soft and not crispy like actual french fries.  This was a little disappointing, so I attempted another batch at 350 degrees for 25 minutes to see if I would get a different result.  Unfortunately, the result was pretty much the same. 

To serve, sprinkle the rutabaga with garlic powder, paprika and kosher salt.  Even though they were not crispy, they still made a tasty side dish.


Wednesday, February 8, 2012

When Life Gives You Giant Cauliflower...

Much needed winter rains have my garden vegetables doing the happy dance.


Harvesting this guy was like boating a marlin.  I had to use my large garden loppers to cut it loose.  Even after removing all the leaves, I had to cut it in half just to fit it in the fridge.

So, when life gives you giant cauliflower, it's time to find some new recipes.  Here's a roasted cauliflower recipe I tried today.  It was actually very good.  I hope you'll try it sometime.

Roasted Cauliflower

Ingredients:
Cauliflower
2-3 cloves minced garlic
Lemon Juice
Olive oil
Salt and Pepper
Parmesan Cheese

Instuctions:
Preheat your oven to 400°F. Cut the cauliflower into pieces and place the pieces in a single layer in a baking dish. Sprinkle the garlic and lemon juice over the cauliflower.  Drizzle each piece of cauliflower with olive oil. Salt and pepper to taste.  Bake uncovered for 25-30 minutes or until the top is lightly brown and a fork can easily pierce the cauliflower. After removing the cauliflower from the oven, sprinkle generously with Parmesan cheese .

Cauliflower prepared and ready for the oven
Roasted cauliflower ready for the dinner plate

Saturday, November 26, 2011

Backyard Edibles

In Issue No. 20 of Edible Austin magazine, Amy Crowell talks about foraging for wild edible foods.  I’m not an expert on the identification of backyard edible weeds, but there was one plant that she talked about that I can easily identify.  That plant is Turk’s Cap.  
In the fall, Turk’s Cap produces a small red, edible fruit.  The fruits look like little apples, but the question is, do they taste like little apples?  I’ve read conflicting opinions of what this fruit taste like.  Some say it is bitter, some say it does taste like apples, and Amy suggests that it has an “earthy, cucumber-sweet flavor”.


I think I’ll see for myself.  Here’s Amy’s recipe from her article titled, Fast Foraging:

1 c. ripe, red Turk’s cap fruit
2 c. water
¼ c. sugar (or to taste)

Wash the fruit and place it in a saucepan with the water and sugar. Simmer for about 20 minutes, until the fruit softens. Crush the fruit with the back of a large spoon or a masher. Strain the liquid through cheesecloth, and gently squeeze out all the juices. Let cool and serve over ice.
 
For my little taste test, I'm halving the recipe.  I didn't have cheesecloth on-hand, so I pressed my fruit through a strainer, which seemed to work fine.
Adding 1/2 Cup Fruit
Stirring in Sugar
Straining Fruit
So, what does it taste like?  Hmmm... it's not bad.  Definitely not bitter.  I think it has a light apple cider flavor.  I may have overwhelmed the fruit with a bit too much sugar.  The flavor is very faint.
 
Amy recommends that by adding some tequila, this versatile beverage can be transformed into a cocktail.  Now we're talking.  Cheers!

Friday, November 11, 2011

Quick and Easy Bruschetta

Don't let the name Bruschetta scare you off.  Brushetta only sounds fancy.  It's a really simple, healthy food, that's very easy to prepare.  If you can make toast and chop tomatoes, you're on your way to a tasty hors d'oeuvre, light lunch or side dish.

This basic recipe can be easily altered to match the ingredients you have on-hand.  Use any kind of tomato, fresh or dried herbs, and whatever kind of bread you like.  Today I'm using Campari tomatoes, dried basil, fresh oregano and cocktail bread slices to make a lunch side dish for two.  

 
Here are the basic ingredients you'll need:
  • tomatoes
  • basil
  • oregano
  • garlic clove
  • olive oil
  • balsalmic vinegar
  • salt and pepper
  • bread

Assemble the tomato mixture by combining the following ingredients:
  • 4 chopped Campari tomatoes
  • 1/2 tsp dried basil
  • a pinch of fresh, chopped oregano
  • 1 clove of garlic, minced
  • 1 T olive oil
  • 1 T balsalmic vinegar
  • salt and pepper to taste
  • parsley garnish, optional
   
Set the tomato mixture to the side to marinate.

Toast 6 cocktail bread slices and lightly brush with olive oil, if desired. Heap a spoonful of the tomato mixture onto the toasted bread using a slotted spoon. Top with a sprig of parsley, and serve.
 
Voila, here is the finished product served with broiled teriyaki chicken wings. Yum.

Friday, November 4, 2011

Almost Famous Zucchini Bread

Whether you’re trying to find uses for your excess garden zucchini or purchasing store bought, this zucchini bread is a real crowd pleaser.  This recipe makes 2 loaves, but it freezes very well.  Use a loaf now and save one for later.  Serve this bread warm or cold.  Top it with butter, whipped topping or just eat it plain.  This bread is so good even the non-zucchini eaters in your life will love it.  Enjoy.
 
3 eggs
1 cup oil
2 cup grated zucchini
2 tsp vanilla extract
3 cup flour
2 ½ cup sugar
1 tsp salt
1 tsp baking soda
3 tsp cinnamon
¼ tsp baking powder
1 cup chopped pecans

Preheat oven to 350 degrees.  Prepare 2 well-greased loaf pans.  Beat the eggs and then add oil, zucchini and vanilla.  Continue to beat until foamy.  Slowly add the flour, sugar, salt, baking soda, cinnamon and baking powder.  Continue to beat until smooth and well-blended.  Gently stir the pecans into the batter.  Divide the batter into the 2 loaf pans.  Bake for 1 hr 15 minutes.  Test for doneness at 1 hr.

Bakers Notes:
1.   Spraying the loaf pans with cooking spray works fine.  I use nonstick pans, but I still spray them with cooking spray. 
2.   Remove the bread from the loaf pans while still warm.  If you let the bread fully cool in the loaf pans, it will stick.
3.   Do not overcook.  Overcooking dries out the bread.  Optimal cooking time depends on the size of the loaf pans and the oven.  Check the bread with a knife at 1 hr and judge how much more time is needed.
4.   Smaller loaf pans may be used to make mini-loaves.  Reduce the cooking time as needed to about 45 minutes.

Sunday, October 16, 2011

The Southern Pea Meets a Yankee

You'se guys who grew up here in the South may already know about these wicked, tasty veggies called black-eyed peas, but this New England Yankee only recently discovered them.  In the interest of full disclosure, even though I've been living here in Texas since 1983, I was convinced I didn't like black-eyed peas.  Turns out I was wrong.

Black-eyed peas, also called southern peas, crowder peas or cowpeas, are an easy to grow legume.  The peas can be planted in Central Texas from late April through August.  They are very drought and heat tolerant.  Harvest is in about 85-100 days depending on variety.

I decided to grow black-eyed peas because there's very little that will grow in the heat of a Texas summer, and I thought my chickens might like them (they do).  I planted my first crop in June, and I liked them so much, I planted a second crop in August.  The June crop grew fast and tall, so when I replanted in August I decided to use some fencing as an improvised trellis.  The August planting did not grow as tall, but the peas were still plentiful.

The peas can be harvested young, when the swollen pods are still green, for eating fresh.  

Harvested pods can be stored in the refrigerator until you are ready to shell them.

Shelling black-eyed peas takes time and is best done with a couple of extra hands.  Sometimes you can get lucky and find someone willing to help.  I call this picture, "will shell for football".

Shelling operation underway.

When the pod strings are removed, sometimes you get lucky and they slide out into the bowl.

My favorite way to eat black-eyed peas is with onions and bacon.

When the onions are tender, add the peas and cover with water.  Bring to a boil, then reduce heat and cover for about 20 minutes.  Yum, I can't wait for next year.  I'll be sure to grow black-eyed peas again.