Showing posts with label How To's. Show all posts

Sunday, June 24, 2012

Building a Rain Chain Fountain

A rain chain is an ornamental accessory that replaces your gutter down spout.  Instead of the typical hollow, metal water shoot, a decorative chain is hung from the gutter, slowing the rain before it finally hits the ground.  Zinger Hardware carries an excellent variety of rain chains.  View some of the options available at their online supplier, RainChains.com.

Rain chains are great when it's raining, but sometimes rain can be a little hard to come by here in Central Texas.  Okay, rain can be really hard to come by.  If you miss the sound of rain, building a recirculating rain chain fountain can keep it raining all year round, and you don't even need gutters.

I first saw the recirculating rain chain fountain idea demonstrated at the Hill Country Water Gardens.  This style of fountain can be built using a disappearing fountain basin.  You can purchase a basin like the one I bought at The Natural Gardener.  The ready made basins provide for easy installation and come with everything you need.

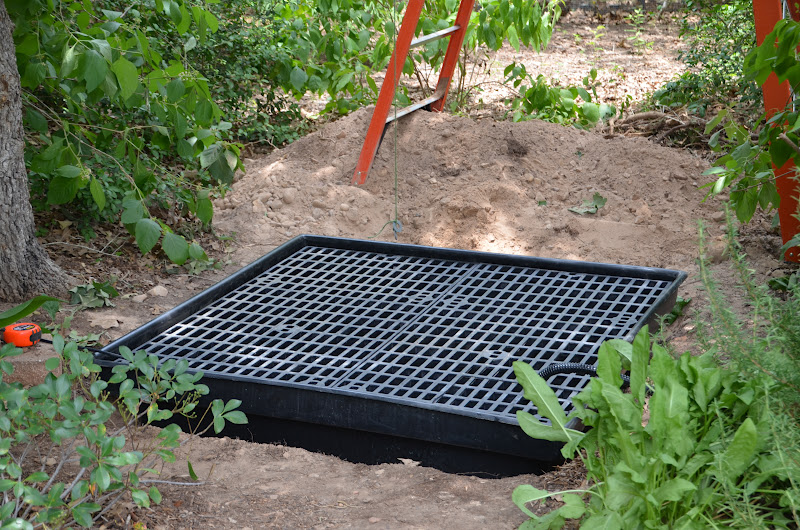
For this project, I'm using a 4 foot square basin that is 1 foot deep.  While digging the hole, we hit some tree roots and decided not to sync it flush with the ground.  This is not a problem with the rigid plastic basins, since rocks can be piled up later to hide the basin.  After digging the hole, placing sand in the hole will make it easier to level the basin.


When the basin is level, add the cinder blocks, which will support the grate, urn and rocks that will be added later.

To create the effect of water splashing through a rain chain, the water will be pumped through a hose to the top of a tree branch.  The rain chain will hang from the branch and splash into an urn. The idea is to hide all of the hoses and equipment, so the water appears to magically drip from the tree.

Determining the power of the pump needed for this project was challenging.  Pumps are rated for vertical lift, but this rating turned out to be more of a guesstimate where this project was concerned.  We needed to get the water from the reservoir to the top of the tree branch with just the right amount of force.  After trying 3 pumps we finally got the right amount of power.  

We started with an 1800 GPH pump which sent the water rushing into the rain chain with the force of a fire hose.  We installed a ball valve, shown below with the blue on/off knob, to reduce the flow of water into the hose.  With the 1800 GPH pump, we had to reduce the flow to the point where the pump whined, but the flow was still too forceful.  

We decided to switch to a 900 GPH pump.  This pump didn't have enough vertical lift to raise the water to the top, so no water came out of the hose at all.  

Finally, we tried the 1200 GPH pump with success.  The ball valve helps lower the water pressure slightly to reduce splashing, but still moves the water to the top of the rain chain.  It's important to get just the right amount of splash.  You want to hear the water noise, but you don't want water going everywhere, which will empty the reservoir quickly.

The tree branch is 13 feet 7 inches above where the urn will sit.  Eighteen feet of black tubing was used to cover the distance from the pump in the basin, up the tree, down the branch, and finally, into the rain chain cup.  Zip ties with small pin nails were used to secure the tubing to the tree.


To keep the rain chain centered in the urn, weight it to the bottom of the urn with a brick or rock.  Prior to setting the basin, urn and chain in place, you might try hanging a string with a washer attached to the branch to help visualize the project's center point.  With everything lined up and the pump installed in the reservoir, it's time to add water. 

The urn was purchased at The Great Outdoors during a 20% off sale.  I got great deal and I'm happy with how the coppery flecks in the urn seem to tie in with the color of the rain chain's hummingbird cups.    

The test run shows good water flow, which can be adjusted with the ball valve.  The pump is on a timer which allows the fountain to run in the late afternoon and early evening.  Reducing the amount of the flow and the numbers of hours running will help lessen water loss and minimize the need to refill the reservoir.

The final step in this project is to add rocks and plants.  Rocks hide the basin and plants soften the look. We used bull rock leftover from a previous project.  The existing plants helped make the project feel established, but we installed some Fern Leaf Bamboo behind the fountain to make it feel complete.

Interestingly, wildlife was immediately attracted to this water feature for bathing as well as a quick drink.  The rain dripping down the chain acts as a birdie shower, and since the overflow at the edge of the urn is slow, it's a great place to perch and grab a drink.


Sunday, June 10, 2012

The Fairy Bistro Set

My husband and I are working on a new fountain project.  We needed a pump and some helpful advice, so we took a trip to the Hill Country Water Gardens and Nursery in Cedar Park.

Hill Country Water Gardens is almost an hour drive for me, so I don't go there often.  They have expanded so much over the years.  I'm always amazed when I pay them a visit.  There are lots of cool fountains, statuary and plants, but what do I absolutely fall head over heels for?  A fairy bistro set.

I really didn't have any intention of building a fairy garden.  Like I said, we already had a fountain project that we were working on, but that bistro set, with it's cute, little cloche bell jar, spoke to me.  It said, "Take me home and build a fairy garden."  Must have been the little people.

Fairy gardens are miniature gardens that are assembled in large shallow containers. I've seen them constructed in Radio Flyer wagons and incorporated into the landscape.  Both of those are cool ideas, but for my first  fairy garden, I'm going to use a large shallow pot.

My plan is to have a small water feature divide the container.  I decided to build a small pond with stream using a plastic liner so it will hold water.  This did not work as well as I'd hoped.  The soil in the container was just too loose and crumbly.  To add structure to the stream and pond, I recycle an egg carton and a cool whip container to create support, then, lay the plastic on top.


I can already see that hiding the plastic is going to be tricky.  I decide to plant the little mosses and think about how I can make this better.  I add my little fairy bird bath and my windmill, and head off to find some more stones.  Luckily, I have lots of little rocks and pea gravel around the yard.

To finish up the display, I added a cactus, a sedum, and a wooly thyme.  I've added lots more rocks to try to hide the plastic liner, but I'm just not satisfied with the water feature.  At least it seems to hold water.

So, I say goodbye to the little pond, and start my redesign.  I decide to go with more of a dry creek look, and start working on a little arbor to cover the bistro set.  I found the perfect piece of leftover flagstone for a little bridge over the creek. 

The arbor is constructed with twigs that are lashed together with heavy duty brown thread.  I added a touch of glue for extra strength in the corners, and a little dab for each of the twigs which make up the roof.


Perfect!  I think this fairy garden shows off the little bistro set to it's best advantage.  I hope the fairies are happy!


Wednesday, May 23, 2012

It's Wonderful


The ‘Wonderful’ variety of pomegranate tree has large orange-red flowers and deliciously tangy purple-red fruit.  Well, at least that’s what the label says.  I’ve yet to see a flower or fruit, so at this point I’m going on faith.

I have wanted to try growing a pomegranate tree for awhile.  I was just waiting for the right opportunity to present itself.  I needed to find a spot in full sun with good drainage and I just couldn’t decide on the perfect location until recently.

No one likes to see a beautiful, stately oak tree die before it’s time, but the recent removal of a dead tree presented me with a pomegranate planting opportunity.  

To get my pomegranate tree off to the best start possible, I’m going to plant it using the recommended planting instructions provided on the grower’s label.  The first step is to dig a hole three times the diameter of the root ball.


The instructions recommend setting the top of the root ball two inches above grade, so be careful not to dig the hole too deep.  Planting a tree too deeply is probably the biggest planting mistake that people make when planting a new tree.

I like to mix compost into the native soil.  My soil ranges from sand to clay, but this site contains a sandy loam that is more on the sandy side.  The compost will help the soil retain moisture, which the pomegranate will appreciate. 

Fill in the hole and create an ample basin around the tree.  A large water basin will ensure the water soaks down into the root ball where it is needed for the tree to get established.

 If I take care of this tree, in a couple of years, I’ll have tasty pomegranates.  Isn’t that wonderful?


Wednesday, April 25, 2012

Tonka Tour

Did you ever have your very own Tonka truck?  I never did.  I was Tonka deprived as a youth, but I'm making up for it now.  I purchased my very own second-hand Tonka truck and for just a few dollars, I made a very cool toy fit for the most discerning gardener.  Here's my Tonka truck garden just after completion.


After constructing Tonka, I thought, what the heck, let's go for a spin.  First stop, the Chick Inn.  Hmmm... I guess the chicks are out gallivanting. 

I kinda see why 5 years boys like these Tonka trucks.  My Tonka is king of it's little garden world.  Let's cross the bridge and go check out the watermelon patch.


My garden pond doubles as a huge lake in Tonka's world.

Driving a Tonka truck around is exhausting.  I  think it's time to find a place to park, after all, I'm not 5 years old anymore.  I thought this spot next to my new Sharkskin Agave and Bronze Dyckia would be good, but it doesn't really show Tonka off to her best advantage.

Ah, this is perfect.  The yellow pansies really bring out the color in her chassis.  

I hope you'll consider having a little fun with your garden containers.  If a yellow Tonka truck isn't really your style.  Consider this adorable plastic pail potted up with purple Angelonia.

Or, grab an old red wagon and use your imagination.  Do you see a moss covered fairy land or a desert oasis full of cactus?  It's all child's play.  Have fun!


Sunday, February 12, 2012

Be the Bee: A Look at Hand Pollination

Pollinating by hand is easy, but monotonous.   Bees are hard workers, and hand pollinating makes me appreciate their labors more than ever.

In order to duplicate bee activity and become the pollinator, it helps to understand what needs to happen.  The pollen, which is located on the anthers, needs to move to the stigma. Bees do this naturally as they move around each flower collecting nectar.   The anthers and stigma are illustrated in the drawing below from the American Museum of Natural History.  

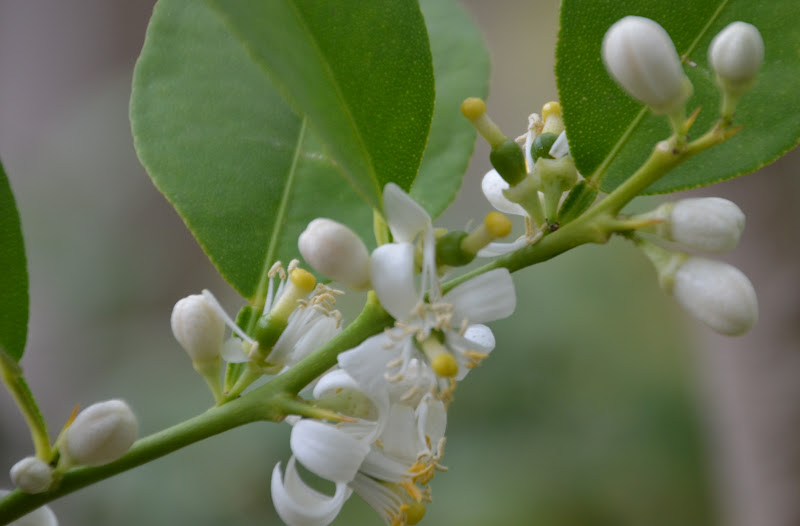
Here's a picture of a Mexican lime blooming in my greenhouse today.  It's anthers are laden with pollen and the stigma is sitting in the middle of the flower waiting for the pollen to arrive.

While most citrus is self-pollinating, I like to increase pollination by placing my plants outside for the bees to visit.  Considering we've just had a cold front roll into town, this is not practical.  I think I'll leave my citrus in the greenhouse and try my hand at some manual pollination.

I'm using a small paint brush to pollinate, but you can use a cotton swab, a pencil eraser, or even your finger among other things.  The idea is to visit each flower touching both the anthers and the stigma with each visit.

Be the Bee.  Funny, after just a few flowers, I'm already worn out and little bored.  How do bees do it?

The ovaries of the pollinated flowers swell to produce fruit.  This Mexican lime was a heavy producer last year and looks like it's already on it's way to producing lots of fruit again. 

Try your hand pollinating some time.  You will quickly come to appreciate bees.  I sure do!

Monday, January 30, 2012

Time for Taters

I planted my potatoes already.  What am I crazy?  President's Day weekend has been my traditional potato planting time of the year for quite a while, but not this year.  With this insanely warm weather we've been having, I think I'll roll the dice and live dangerously. 

Planting potatoes this early is not without risk.  I'll need to be prepared to cover the plants if the weather takes a turn to the extreme, which is not uncommon here in Texas. 

Why would I want to take this risk and plant early?  Timing.  To have a good harvest of potatoes, I need to grow healthy, strong plants when the temperatures are cool.  I have a feeling that summer is coming early this year.  In order to harvest in May, before temperatures get too hot, I need to get going and plant early.

When I purchased my seed potatoes a week ago, I selected mostly smallish potatoes, to reduce the number of potatoes I would need to cut and prepare.  The larger potatoes can be cut, but cut potatoes need to be treated with wettable dusting sulphur and allowed to dry.  I'm going to admit right now, I usually don't have the patience for this.  Oh sure, I treated the cuts, but then I stuck them right into the ground.  Naughty girl.

There's all sorts of fun ways to grow potatoes, but I'm a rather boring and old fashioned follower of the trench method.  My hubby dug these beautiful trenches for me.  He likes homegrown potatoes as much as I do, so we usually work on this project together.

This year I'm planting 2 - 3 X 12 foot raise beds with potatoes.  One bed will be planted with the Kennebec and the other will be planted with the Red La Soda.  The potatoes are placed in the trenches about a foot apart and covered with 4 inches of soil. 

As the potatoes grow, we'll pull the soil in around them until we reach the top level of the bed.  After that, we'll mound up dirt, compost and hay around the stems to promote more potato growth and hopefully keep the soil moist and cool.  The drip irrigation lines are a little out of sorts during this whole process, but eventually they'll be level with the plants.


I love homegrown potatoes.  Potatoes you grow yourself can't compare with their grocery store cousins. Homegrown potatoes are incredibly firm and flavorful.  Both varieties I like to grow, Kennebec and Red La Soda, are thin skinned, so there's no need to peel them.  They taste so fresh and don't have that mustiness that you find in grocery store potatoes. 

I hope I've inspired you to try to grow potatoes yourself.  I'm going to close with a picture from April of 2010.  The potatoes in the foreground are bookending a small stand of blue bonnets, and look at how green it was back then.  Almost like Ireland, huh?  

Tuesday, January 24, 2012

Egg Cartons are for Eggs

Egg cartons are an engineering marvel for the transport of eggs.  The original designer of the egg carton probably never foresaw the wide variety of craft and garden projects for which the humble egg carton would be put to use. 

One such garden project, that I decided to try, is to convert an egg carton into a seed starting tray.  At first glance, the egg carton seems to be the perfect container for this purpose.  The carton is divided into 12 perfectly sized seed starting nooks.  An egg carton fits perfectly onto most sunny window sills.  And, the best part, egg cartons are free.  What more could you want?

So, back on January 11th, I decided to experiment with both styrofoam and cardboard egg cartons to start some seeds.  I read about some pros and cons for each type.  The cardboard version seemed to find favor for the fact that it broke down easily, but many people complained that the cardboard got prematurely soggy.  The styrofoam version was popular with some because it was re-usable and didn't get soggy.

The cardboard carton needed little preparation except to cut off the lid and fill the cells with soil.  The styrofoam carton by contrast needed drainage holes.  This can be done easily by punching holes in the foam with a nail.  Even though it was an extra step, it was simple to do. 


I planted lettuce in the background carton, peppers in the middle carton, and basil in the front carton.  The germination rates in the cartons did not seem any different from using an egg carton vs. a plastic tray.  Although, I will say when using a heat mat, these tiny celled cartons heat up very quickly.  I had to put a towel between my heat mat and the carton to lower the temperature.

There are 2 problems that I saw with using the egg cartons.  The first is that the soil in the cartons dry out very quickly.  The cardboard cartons in particularly dried out very quickly.  In order to slow down the process, I placed the cardboard cartons in plastic bags.  The bags helped keep the soil moist, however, the cardboard turned into a wet, steamy, soggy mess.  Now, the cartons are practically falling apart, and I can't wait for my seedlings to get big enough to move to their new home in a 4-inch plastic pot.

I would have to say that egg cartons are best saved for eggs and perhaps those cute little Christmas tree ornaments that you make when you're in Kindergarten.  I don't think I'll be using egg cartons for seed propagation again any time soon.  

Given the choice, I would pick a recycled plastic tray.  A plastic tray, like the one below, holds moisture without falling apart.  Plus, I can recycle the same container again next year and the year after.  You can't say that for the cardboard carton that sits to the right.