
Rain chains are great when it's raining, but sometimes rain can be a little hard to come by here in Central Texas. Okay, rain can be really hard to come by. If you miss the sound of rain, building a recirculating rain chain fountain can keep it raining all year round, and you don't even need gutters.
I first saw the recirculating rain chain fountain idea demonstrated at the Hill Country Water Gardens. This style of fountain can be built using a disappearing fountain basin. You can purchase a basin like the one I bought at The Natural Gardener. The ready made basins provide for easy installation and come with everything you need.
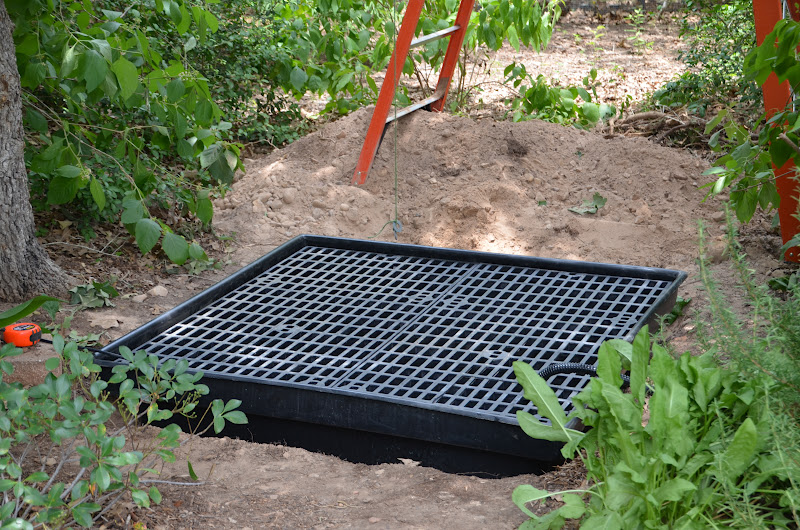
For this project, I'm using a 4 foot square basin that is 1 foot deep. While digging the hole, we hit some tree roots and decided not to sync it flush with the ground. This is not a problem with the rigid plastic basins, since rocks can be piled up later to hide the basin. After digging the hole, placing sand in the hole will make it easier to level the basin.


When the basin is level, add the cinder blocks, which will support the grate, urn and rocks that will be added later.

To create the effect of water splashing through a rain chain, the water will be pumped through a hose to the top of a tree branch. The rain chain will hang from the branch and splash into an urn. The idea is to hide all of the hoses and equipment, so the water appears to magically drip from the tree.
Determining the power of the pump needed for this project was challenging. Pumps are rated for vertical lift, but this rating turned out to be more of a guesstimate where this project was concerned. We needed to get the water from the reservoir to the top of the tree branch with just the right amount of force. After trying 3 pumps we finally got the right amount of power.
We started with an 1800 GPH pump which sent the water rushing into the rain chain with the force of a fire hose. We installed a ball valve, shown below with the blue on/off knob, to reduce the flow of water into the hose. With the 1800 GPH pump, we had to reduce the flow to the point where the pump whined, but the flow was still too forceful.
We decided to switch to a 900 GPH pump. This pump didn't have enough vertical lift to raise the water to the top, so no water came out of the hose at all.
Finally, we tried the 1200 GPH pump with success. The ball valve helps lower the water pressure slightly to reduce splashing, but still moves the water to the top of the rain chain. It's important to get just the right amount of splash. You want to hear the water noise, but you don't want water going everywhere, which will empty the reservoir quickly.

The tree branch is 13 feet 7 inches above where the urn will sit. Eighteen feet of black tubing was used to cover the distance from the pump in the basin, up the tree, down the branch, and finally, into the rain chain cup. Zip ties with small pin nails were used to secure the tubing to the tree.


The urn was purchased at The Great Outdoors during a 20% off sale. I got great deal and I'm happy with how the coppery flecks in the urn seem to tie in with the color of the rain chain's hummingbird cups.

The test run shows good water flow, which can be adjusted with the ball valve. The pump is on a timer which allows the fountain to run in the late afternoon and early evening. Reducing the amount of the flow and the numbers of hours running will help lessen water loss and minimize the need to refill the reservoir.

The final step in this project is to add rocks and plants. Rocks hide the basin and plants soften the look. We used bull rock leftover from a previous project. The existing plants helped make the project feel established, but we installed some Fern Leaf Bamboo behind the fountain to make it feel complete.
Interestingly, wildlife was immediately attracted to this water feature for bathing as well as a quick drink. The rain dripping down the chain acts as a birdie shower, and since the overflow at the edge of the urn is slow, it's a great place to perch and grab a drink.

Very nice ally! You and the dh did a great job! Can't wait to come hear the splashing. Bottle of wine - adirondak chairs - listening to the rain chain. Heaven!
ReplyDeleteThanks Chris. That does sound like heaven!
DeleteIt's beautiful, Ally. When we installed our disappearing fountain a couple of years ago it acted as a goldfinch magnet! They love it and use it frequently. It's interesting how different birds are attracted to different water sources. The cardinals and jays prefer the still water in the birdbaths, the dove and mocking birds the stock tank, and the finches and chickadees the fountain.
ReplyDeleteYou're totally right. I noticed right away that the chickadees prefer the new fountain. This is our 5th water feature, so hopefully, there's a little something for everyone.
DeleteVery cool - I look forward to seeing it in person. ;)
ReplyDeleteYou're welcome anytime, but I hope to plan a get together soon. Maybe in the fall when it cools down.
DeleteHmmm, where could I put one?? Great job--I've seen this at HCWG and liked it, so it's nice to know that a real person tried it with success. Thanks for the inspiration, Ally.
ReplyDeleteHCWG has a rain chain fountain over one of their ponds. If you had a limb over a pond, this would be a cool thing to try. One of our fellow bloggers has a rain chain fountain dripping water on the corner of her screen house. Here's a link: http://vivaidea.net/vivaverde/?p=618#content. I hope that gives you more ideas.
DeleteI love the use of the rain chain.
ReplyDeleteThanks Anny. This was a fun way to incorporate a rain chain into the landscape in an unusual way.
DeleteHad to come check out the rain chain and water feature after hearing all about it this morning - looks great! A lot of hard work but well worth it.
ReplyDeleteThanks for checking out our project. Except for all the issues with the size of the pump the bulk of the project was completed in a weekend. The hard work will pay off for years to come.
DeleteThis comment has been removed by the author.
ReplyDeleteWhat are copper rain chains? I've heard of them but I'm too lazy to look it up for myself on google.
ReplyDeleteA down spout is part of the gutter system on a house. The down spout is usually a piece of gutter piping, which carries the water from the gutter to the ground. A rain chain is used as a replacement piece to the down spout. Rain chains are usually a decorative series of chains and objects that a strung together. The rain chain slows down the water as it flows from the gutter to ground. They are frequently made of copper, because copper does not rust and produces a lovely patina over time.
DeleteDid you plug the hole in the bottom of your vase or do you let the water flow from it?
ReplyDeleteYes, the hole in the bottom of the vase has been plugged with a special putty that hardens.
DeleteThanks!! I think I have just the thing!
DeleteIf you're looking for a high-quality outdoor water fountain, The Fountains Store is the perfect destination for you. They offer a wide variety of fountains, designed to enhance the beauty and tranquility of your garden, patio, or outdoor space. Whether you're interested in a classic tiered fountain, a modern sculptural design, or a tranquil stone water feature, The Fountains Store provides top-notch options for all preferences. Their products are crafted with durable materials to ensure longevity, and they offer easy online purchasing for convenience. Transform your outdoor area into a serene oasis with a beautiful water fountain from The Fountains Store today!
ReplyDeleteIndulge in a symphony of sight and sound with our Musical Fountains. Choreographed to enchanting melodies, these captivating displays add a touch of magic to gardens, parks, and public spaces.
ReplyDelete