Monday, November 7, 2011

The Dirty Truth

Raising backyard chickens can be very rewarding, but I would be remiss if I didn’t tell you the dirty truth:  chickens are messy.  Chickens eat all day, so naturally, they poop a lot.  Chicken poop, while not exactly toxic waste, is pretty darn close.  
   
Cleaning the coop is a weekly job that should not be overlooked.  A dirty coop can be harmful to the health of your flock, and your neighbors probably won't be too happy about it either.

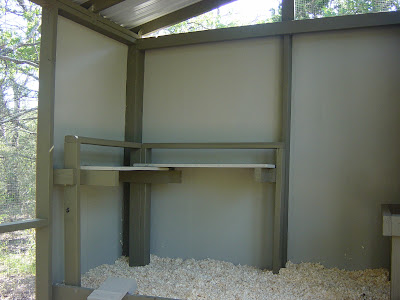
A well thought out coop design can simplify cleaning.  For example, a sand floor can help keep the ground dry and makes it easier to rake out the debris.  

Installing poop boards under the roosting area is another good idea. The boards collect the the nightly droppings and assist in keeping the coop floor clean.  Poop boards that are removable can be washed more easily and left in the sun to dry.  

A regular once a week cleaning has been working pretty well for my small flock.  My tools of the trade are a rake, putty knives, a kitty litter scoop, and a bucket.    

First, use the putty knife to scrape the poop boards.  A metal putty knife is essential for scraping.  Chicken poop seems to have the holding power of super glue.

Next, move on to cleaning the floor.  Skim the top surface of the sand with the back side of the rake and remove the debris pile.  Use the tines of the rake to turn up clean sand and rake the surface smooth.

A kitty litter scoop is a handy tool for sifting the debris out of the sand.


Don't forget, chicken poop makes a great addition to the compost bin.

Sunday, November 6, 2011

Greenhouse Build - Week Three

When has a construction project ever proceeded on time and on budget?  The answer to that elusive question, eludes me.  Progress has been made none the less, but the greenhouse is not finished. 

More on that, but first, an unexpected freeze warning sent me scrambling on November 3rd. Plants were moved to the front porch and into the house to protect them just in case.  

Tender Plants Staged on Front Porch
Covered Plants Hope for the Best


Welcome to the Indoor Jungle.  


Back to the construction update...
    
Greenhouse construction has been proceeding, but the devil's in the details, and those details have really slowed things down.  The trim work and finishes are taking more time than anticipated.  Still, some exciting progress was made.  In the picture below, the automatic solar vent openers can be seen opening the windows.  The vent openers getting the most sun open fully, while those in the shadows lag behind.

A view from the front shows the window trim is almost complete and decorative corbels are being added to the clerestory roof line.

A view from the back shows the 6 foot slider windows trimmed out.  The clear polycarbonate, while see through, does not provide the same clarity as glass.  These windows will provide a nice view as well as cross-ventilation.

With any luck, the next update will be my final progress report.  Cross your fingers, say a prayer, knock on wood, and stay tuned.


Saturday, November 5, 2011

How to Treat Cabbage Worms

Cabbage and other members of the crucifer family such as broccoli, Brussels sprouts, rutabagas and kale are a favorite food source for caterpillars and worms that are prevalent in the fall.  Luckily, there is a way to safely get rid of these little trouble makers before they turn your cabbage into Swiss cheese like the plant pictured below. 

Look for products containing the active ingredient bacillus thuringiensis (BT).  Common product names are Thuricide, Dipel, and Safer Caterpillar Killer.  These products come in both liquid concentrates and dusts. 

BT is a naturally occurring bacterium which affects worms and caterpillars.  Early treatment is best, since BT is most effective on smaller worms and caterpillars.  Once the worms and caterpillars ingest the BT, they will stop feeding and will die in 1-2 days.  BT is considered safe for people, other wildlife and beneficial insects. 

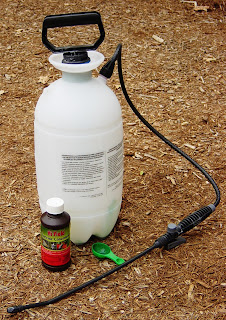
Today, I’m mixing up Thuricide liquid concentrate, which is sprayed using a pump sprayer, at a rate of 4 teaspoons per gallon.  

Be sure to thoroughly spray the tops and bottoms of the leaf surfaces.  BT degrades in sunlight, so it’s best to spray in late afternoon or early evening. 

If the caterpillars or worms persist, repeat the spray every 5 days or according to labeled instructions.


Friday, November 4, 2011

Almost Famous Zucchini Bread

Whether you’re trying to find uses for your excess garden zucchini or purchasing store bought, this zucchini bread is a real crowd pleaser.  This recipe makes 2 loaves, but it freezes very well.  Use a loaf now and save one for later.  Serve this bread warm or cold.  Top it with butter, whipped topping or just eat it plain.  This bread is so good even the non-zucchini eaters in your life will love it.  Enjoy.
 
3 eggs
1 cup oil
2 cup grated zucchini
2 tsp vanilla extract
3 cup flour
2 ½ cup sugar
1 tsp salt
1 tsp baking soda
3 tsp cinnamon
¼ tsp baking powder
1 cup chopped pecans

Preheat oven to 350 degrees.  Prepare 2 well-greased loaf pans.  Beat the eggs and then add oil, zucchini and vanilla.  Continue to beat until foamy.  Slowly add the flour, sugar, salt, baking soda, cinnamon and baking powder.  Continue to beat until smooth and well-blended.  Gently stir the pecans into the batter.  Divide the batter into the 2 loaf pans.  Bake for 1 hr 15 minutes.  Test for doneness at 1 hr.

Bakers Notes:
1.   Spraying the loaf pans with cooking spray works fine.  I use nonstick pans, but I still spray them with cooking spray. 
2.   Remove the bread from the loaf pans while still warm.  If you let the bread fully cool in the loaf pans, it will stick.
3.   Do not overcook.  Overcooking dries out the bread.  Optimal cooking time depends on the size of the loaf pans and the oven.  Check the bread with a knife at 1 hr and judge how much more time is needed.
4.   Smaller loaf pans may be used to make mini-loaves.  Reduce the cooking time as needed to about 45 minutes.

Thursday, November 3, 2011

'Blue Dawn' Morning Glory

Perennial morning glory (Ipomoea Acuminata ‘Blue Dawn’) is a tropical vine which can grow 25 feet in just one season.  In zone 8, this plant dies back to the ground, but comes back strong in the spring.  The flowers are electric blue in the morning and turn purple in the late afternoon.  'Blue Dawn' produces runners which can be very invasive, but are easily controlled with regular pruning.  Planted in full sun on a trellis in a very dry part of my yard, 'Blue Dawn' made it through the summer with very little water.  This vine's drought tolerance and reliability will continue to earn it a spot in my garden.   

Wednesday, November 2, 2011

Kale and Swiss Chard in the Garden

Fall is an exciting time in the veggie garden.  There are lots of tasty vegetables that prefer the cooler temperatures.  If bed space is limited, sometimes it's hard to choose what to grow.

In addition to my staple plants of broccoli, cauliflower, brussel sprouts, cabbage and rutabagas, this year I’m trying out some leafy greens:  Kale and Swiss Chard.

Kale and Swiss Chard have very attractive leaves that can be cooked or eaten in salads.  Young leaves are best, especially in salads, since older leaves can become tough.

The Kale variety I am growing is a Dinosaur Kale called ‘Toscano’.  I'm not sure why it's called a Dinosaur Kale, but I hope it's a hint that it grows to be ginormous.  When mature, ‘Toscano’ has very dark green, savoyed (wrinkled) leaves. 

The Swiss Chard variety I'm growing, called ‘Bright Lights’, comes in assorted colors, such as the yellow and red stemmed varieties pictured below.

‘Bright Lights’  and ‘Toscano’ will grow to be 24-36”H and 18”W.  Both plants need full to part sun, cool mild weather, rich soil, and regular water.  If all goes well, I will be rewarded with some colorful and tasty leaves in about 50-65 days.

Tuesday, November 1, 2011

Around the Town in Oak Hill

November is National Blog Posting Month (NaBloPoMo).  I have agreed to accept the challenge of publishing a blog each day during the month of November.  Many bloggers will accept the challenge, but not all of them will make it.  Will I?  I don’t know.  I’m a rookie blogger, who may have just bitten off more than she can chew.  I hope you’ll check back often and root for my success.  (No gardening pun intended).

The rules for NaBloPoMo are simple.  I need to post each day.  My posts can be any length and may sometimes be as basic as a photograph with a caption.  The point is I have to discipline myself to post everyday; no cheating.  Everything will be written and submitted each day. 

Each day of the week will have a theme to help me organize my thoughts and focus on a topic.  Here’s my plan to divide and conquer this challenge. 
           
·         Chicken Monday
·         Around the Town Tuesday
·         What’s in the Garden Wednesday
·         Thursday Plant Profiles
·         Recipe Friday
·         Saturday How To
·         The Sunday Progress Bar

So, lets get started with Day 1, "Around the Town Tuesday", with an interesting perspective on an Oak Hill neighborhood.

There were some surprisingly steep climbs...

... And some that were steeper still.

There was a lady that took container gardening to a whole new level.

I've never seen so many containers.

She even had a container parterre using roses and bougainvillea.

There was a mailbox arbor that grabbed my attention.

And, last but not least a new fence with some great curb appeal.

Thanks Oak Hill and thanks to Jeanne for being my travel guide.  That's Day 1, and that's a wrap.