
Slowly we started eliminating the Bermuda in the front garden. Our goal was to replace it with a woodland themed garden filled with meandering paths and the sound of water. When the Bermuda was under control in the front, our attention turned to the back garden where the Bermuda grew the thickest.
Since we are on a septic system, we decided the one area we would allow the grass to grow was over the septic field. This grass doesn't get watered or fertilized. It gets mowed only occasionally, and for the most part requires little effort.
To separate the grass from the rest of garden we installed a dry stack wall. This worked pretty well for many years. The Bermuda occasionally made incursions through the wall into the neighboring garden bed, but we just weeded it from time to time.
As the years passed, I eventually started adding plants to the beds adjacent to the Bermuda grass. The new planting beds required irrigation and the Bermuda grass was all too happy to take advantage of that extra moisture. Our little dry stack wall was no longer capable of holding back those vigorous Bermuda runners.
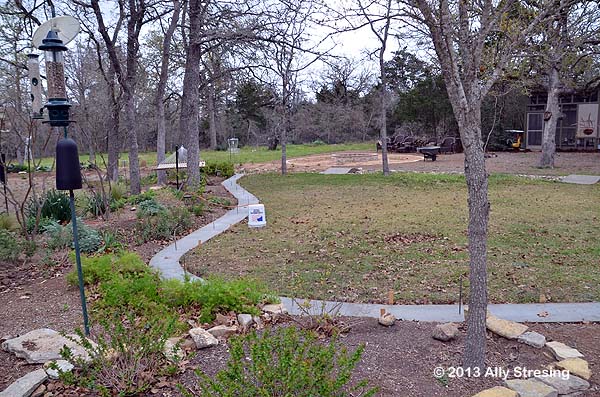
The picture below was taken in fall 2012. The dry stack wall has been removed, and we are beginning to make our plans and preparations for operation "Stop the Bermuda Grass".

In February 2013, we broke ground and started building the footing for the wall. The trench was 87 feet long and 4-6 inches deep. After the trench was dug, bender board was used to form the walls.


In areas where the ground sloped away more sharply, gravel was added to save on concrete.

When the concrete was poured, the results reminded me of a great gray snake slinking through the grass. The rebar posts sticking out of the concrete are tied in to steel mesh. This will give the wall more strength later when the cinder blocks are added.

The cinder blocks will form the center of wall. Decorative bricks will be added to hide the cinder blocks later. We decided to use the same manufactured paver bricks that we used during our fire pit project. Repeating materials helps unify a space. At least that's what the garden design books say.


After the brick paver veneer was glued into place, we realized we had a little problem. The pavers were coming up a little too high, which was causing a gap under the cap stones. We'll have to deal with that problem later.


With all this work going on there's never much time to mow, but looky here. The wall is already stopping the Bermuda. Yay!

So here's the solution to our earlier dilemma. We used cement backer board to fill the space at the top of the wall. Then, thin mortar was added to level everything out.


Ta da! Perfection! The top of the wall is now smooth and level.

This small section of the wall is almost done. The cap stone will be added later when the mortar is dry. I'm very excited to see the finished product.

Another brick in the wall and another brick closer to completion. I'll keep you updated on our progress.
It looks wonderful. I am impressed by your thoroughness, This wall will last for ever and will certainly keep out that bermuda.
ReplyDeleteLooks great!
ReplyDeleteI agree with Jenny....very impressive. That's a lot of work. And, it should last a very long time.
87 feet and 4-6 inches deep.....whew! I believe that might take heavy equipment here on top of all our rock. I've gardened in that 'lovely' clay too, though. So, let me say again....impressive.
Wow, that's a big project. Congrats, it looks great!
ReplyDeleteHoly S---! That looks awesome! I want to show my parents, but I can't because I know they'll want it, and guess who will have to install it? That's right...ME!
ReplyDelete