Showing posts with label Veggie Garden. Show all posts

Wednesday, July 25, 2012

Goldenberry Delicious

When you grow your own fruits and vegetables, there's a certain excitement that comes with picking out a new variety of seed or transplant.  Scanning the seed catalogs especially makes you realize that the abundance of nature is so much more than the sparse offerings that you'll find at the grocery store.

This year I grew a plant that I've never heard of, let alone seen in my local grocery store.  The seed packet I bought called the plant by the name Goldenberry, but I've since learned that Goldenberry is synonymous with Cape Gooseberry and Peruvian Ground Cherry.  Are any of these names familiar to you? 

The Goldenberry is a relative of the tomato and needs very similar growing conditions.  The plants grow in a mounded 2-3 foot tall shrub, which later spreads and sprawls a bit as the plant gets weighed down by fruit and foliage.

Goldenberry produces numerous paper lanterns each containing a juicy berry.

I was very surprised by the prolific nature of this plant.  Production didn't slow down even when the foliage was being feasted on by flea beetles and other leaf munchers.  

When the paper lanterns begin to dry out, the fruit is ready to pick. 

The berries have a taste all their own.  There's a faint tomato flavor, but there is also something distinctly tropical and exotic about them.  I bet they would make excellent jam, but they're good for just popping in your mouth too.  If you're looking for something new for next year's veggie garden, consider giving Goldenberry a try.


Saturday, July 14, 2012

The Summer of the Mite

In my mind, the summer of 2012 will long be remembered as the summer of the spider mite.  If this sounds a little melodramatic to you, wait till you see the photos and then, let me know what you think.

Spider mites have never been a huge problem for me.  I usually spray them with a little water and move on.  Never again will I ignore these nearly invisible, but highly destructive pests.

I think the problem first began in the greenhouse back in March.  I noticed a serious spider mite infestation only after the problem was well-advanced.  The weather was warming up quickly and the greenhouse was hot and dry, which created perfect conditions for the spider mites to breed.  

As I moved the plants out of the greenhouse, I forcefully sprayed the infected plants with water and relocated them to an isolated spot.  The regular water sprays seemed to help, so I kept up the sprays and even bought a special misting device called a Bug Blaster.  I honestly thought that would be the end of it.

When the spider mites made their appearance on my green beans, I wasn't terribly concerned.  I had several excellent green bean harvests and the plants were pretty well played out.  I stopped watering the beans and let the plants die thinking that would put an end to those rascally mites.

The mite infestation on the tomato plants took me completely by surprise.  I've never had spider mites attack my tomato plants, so I wasn't looking for the signs.  That was a mistake.  When I finally noticed the speckled, washed out and dusted appearance of the leaves, the mites had already grown to fantastic numbers.


I knew my plants were in trouble when I noticed visible webbing.  This was a serious infestation.  I was completely amazed and just a little creeped out looking at these pests through my garden magnifying glass.  I wasn't sure what to do next.  I had 12 tomato plants and they were all covered in mites.

Staring at the masses of tomato foliage on plants that stood over 6 feet tall, I somehow knew I wasn't going to get this problem under control.  I decided to pull out my Bug Blaster and try to bring in the remainder of my tomato harvest.

I spent the week trying to decide what to do.  I considered spraying various products such a insecticidal soap, neem oil, or pyrethrum, but the amount of foliage made this seem an impossible task.  Spider mites live under the leaves.  If I sprayed anything on the plants, I would need to get under every leaf surface.  With this much foliage, anything short of a power washer was just not going to be effective.

What I really needed was a flame thrower!  Did I mention spider mites induce insanity?  Not to worry, after  some careful consideration, I came to my senses.  In reality, I'd probably end up hurting myself or burning down something important, so I knew a flame thrower wasn't a good idea.  Besides, I'm partial to my eyebrows.

So, what did I do?  Well, I was definitely on to something with the fire idea, but I needed to approach the problem safely.  I painstakingly cut the plants into small pieces being as careful as I could not to disturb the mites.  I loaded them into the wheelbarrow and dumped them into a small backyard bonfire.

Bye bye mites.  I'll be watching for you.

Saturday, June 2, 2012

Artichokes in Bloom

The Globe Artichoke plants (Cynara scolymus) were very productive this year.  We gorged ourselves on these wonderful, edible thistles and still had plenty for a fabulous flower show.  In my opinion, these are some of the most spectacular flowers you will ever lay your eyes on.  Let me know if you agree.

The artichoke is best eaten when the globes are fully developed, but still tightly closed.  Steamed and served with butter and lemon juice, this tasty vegetable is a real treat.

As the artichoke prepares to flower, the edible scales fold back and the center pushes open.  Finally, the beautiful purple petals begin to appear.


A succession of blooms appear on the same plant.  One immature bud lags behind and finally, all four bloom at once.


"There is no spot of ground, however arid, bare or ugly, that cannot be tamed into such a state as may give the impression of beauty and delight." - Gertrude Jekyll

After weeks of bloom, the last of the humble artichoke thistles fades till next year, but the memories of these truly spectacular flowers are captured forever in my mind.


Sunday, May 20, 2012

The Winner is... Kennebec

Edging out the La Soda Red by a spud, Kennebec is the production and quality winner in my garden this year.


Back in late January, I prepared equal amounts of red and white seed potatoes and planted them in two - 3 foot by 12 foot garden beds.  I normally target my planting date for President's Day, but this year's warm winter encouraged me to try planting early.

Planting early has it's risks.  Freezing temperatures can zap tender seedlings, but I was prepared with row covers in the event that any freezes swooped in.  Nothing of the sort happened and planting early payed off with an early harvest and large potatoes.
Prepared Seed Potatoes
Seed Potatoes Planted in a Trench
The plants in both beds were "dirted" multiple times and received a similar amounts of water and fertilizer.  "Dirting" means to pile dirt around the stem of the potatoes where the potatoes are produced.  

Since potatoes are formed close to the stem and the soil surface, multiple "dirtings" will produce the most potatoes.  I mound the dirt as high as it will go and add a layer of hay to help hold the dirt and moisture in place.


At the end of March, the potatoes bloomed.  The blooms and plants were soon chewed up pretty badly by hungry caterpillars, but they were pretty while they lasted.

By mid-May the plants are falling over and it's time to harvest.  At this point, the potato plants are stressed by the heat and have been munched on by a variety of insect pests.  They look pretty ratty, but that's okay.  The real magic is taking place underground and I'm hopeful as always that this will be the best crop ever.
Plants Ready for Harvest

When it's time to harvest, my husband and I work together.  We pull up the plants and clear away the foliage.  The potato tubers are attached to the mother plant via a root-like stolon.  I've cleared away a side view for a closer look in the photos below.  Notice how the roots have little hairs, but the stolons attaching to the potatoes are smooth.
Clearing Away Foliage
Stem with Tubers
Tuber Close-up
Potato Stem with Tubers and Stolens
We use a fork to loosen the soil and start hunting through the dirt for potatoes.  It's hard work and when we're done the raised beds are a mess.  The fork may pierce a potato or two despite our best efforts not to.  The potatoes heal over the pierced areas, but it's always best to use damaged potatoes first, since they will have a shortened shelf life. 

Look at what we have to show for all of our hard work!  Must be close to 70 pounds of potatoes.  Stored in paper bags and kept in a cool dark place, these beauties will keep for months.  This is good because it will take a while to eat this many potatoes.  Even with giving some away to family and friends, that's a lot of tater salad.

Wednesday, March 28, 2012

Tomato Beavers

What's a tomato beaver you ask?  It's a mysterious and seldom seen creature.  It comes in the dead of night when you least expect it and fells tomato plants like a lumberjack downs a towering pine.  Of course, I'm joking.  There's really no such thing as a tomato beaver, but my poor tomato was gnawed on by something.


The unfortunate victim was a Celebrity tomato cut down in it's prime.  The plant was perfectly healthy when I checked on it yesterday.  It was as big as it's sister plant, Early Goliath, pictured below.

So, what would do this kind of damage?  The most likely culprit is a cutworm.  I have seen more cutworms in the garden this year than usual.  The cutworms I generally see are a smooth worm of about an inch or more.  They are usually dark colored, with long stripes traveling the length of their bodies.  When you hold a cutworm in your hand, they naturally curl themselves up.

Cutworms normally attack smaller seedlings with tender stems.  I really thought my tomatoes were large enough to be past the stage when cutworm damage would occur.  The stems on my plants are starting to get woody and the plants are already setting fruit.  I guess when you're a hungry cutworm, you'll take what you can get.  Here are some pictures of some of my first tomatoes.


I searched the soil surrounding the plant looking for the cutworm without any luck.  While searching the remainder of the bed I did find another cutworm, but I'm pretty sure it was too small to be the worm the killed my tomato.  Still, it's a cutworm, so it was immediately sentenced to death by chicken. 

To protect my tomatoes tonight, I wrapped the bottom of the tomato stems with foil.  This is just a temporary measure.  Hopefully, the foil will provide enough protection to save the plants from further damage.  

As for the dead plant, well, I guess tomorrow I'll be visiting my local nursery for a replacement.

Friday, March 16, 2012

Veggie Garden Transition

Space is my greatest challenge when transitioning from the fall/winter to the spring/summer veggie garden. Many of the veggies I planted in the fall are still productive and spring plantings of onions and potatoes won't be harvested until May.  The majority of my garden space is still in use, so it's time for the hard choices of what goes and what stays.

I need space for the tomatoes, peppers, cucumbers and green beans that I want to plant, so I need to take a hard look at the best candidates for removal.  While I find some space and prepare the garden beds, tomato, pepper and basil transplants wait in 1 gallon pots in the greenhouse.


Some removal decisions are easy.  The broccoli, which started flowering when temperatures warmed up, was bee food and then chicken food.  I cut down the plants one by one and fed them to the girls who really seemed to enjoy them.


I have 4 heads of cabbage left, 2 red and 2 green.  I grew extra cabbage for the chickens, because they love it so much.  When one of the green cabbage heads split, it was easy to decide, which one was going to the girls.  The remaining head of green cabbage and the 2 red will go into the fridge assuming I can find space.


These English peas will stay, but some surprise 'wormy' visitors have taken over my lettuce.  I could treat for caterpillars with BT, but in this heat, it won't be long before the lettuce bolts and gets bitter.  It's probably best to give it to the chickens.  Wow, I'm sensing a trend here.  Those chickens are going to be eating good.

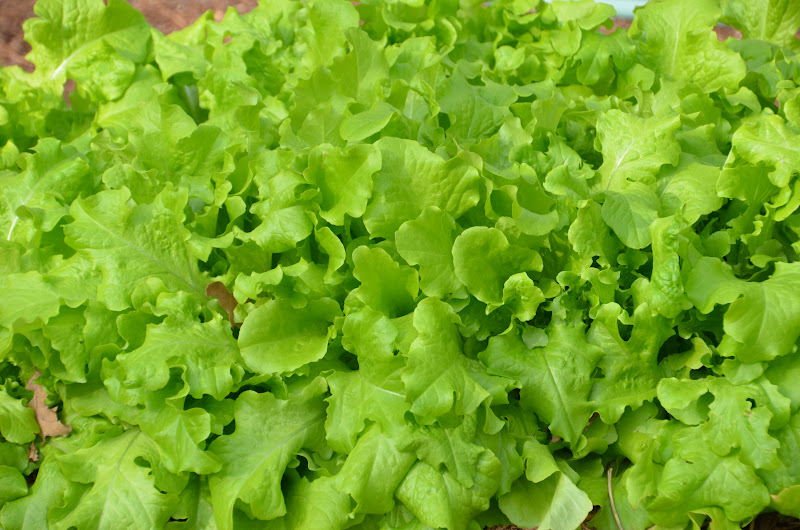
I really hate to say goodbye to this Salad Bowl leaf lettuce.  The greens have been some of the most tender lettuces I can remember.  

I can definitely harvest the last of the spinach, beets and radishes.  The beets will make a nice side dish and the spinach and radishes will go into salads. 

The kale is a bit of dilemma.  Most of it looks pretty good, except this one plant that has decided to bolt.  I guess I'll be making a lot of kale chips.

The artichokes are definitely staying.  I planted these back in November and there are already 4 baby artichokes and hopefully lots more to come.
Photo from November 2011
 
Photo from March 2012 
  
Baby Artichoke Developing
The potatoes, which were planted in late January, will stay in the garden until they are harvested in May.  The plants just received their first dirting.  As the plants grow up, more dirt will be place around the stems.
Potatoes Sprouting

Dirted Potatoes
So, this is what I'm working with.  My vegetable plot consists of 12 raised beds measuring 3' X 12' each. There are 6 beds on the left and 6 beds on the right separated by a wide isle.

On the left half of the garden, working from the front of the photo below, the freshly dirted potatoes will stay, but the bed containing the Brussels Sprouts will get cleared out.  The next bed containing the broccoli has already been cleaned out.  Behind the broccoli is the garlic, which will stay, followed by the cabbage, which will get cleared out.  Finally, way in the back, the peas will stay, but the lettuce will get cleared out.

On the right half of the garden, another bed of potatoes, is not quite visible at the front of the photo.  I planted one bed with white potatoes and the other with red.  The primary rutabaga bed at the front of the photo is looking pretty picked over.  Just 6 more rutabaga left and I can clear this bed out.  Behind the rutabaga, a bed containing a mix of beets, spinach and radishes will go.  The next bed contains onions, followed by a bed containing my beautiful kale and more rutabaga.  I'll try to keep these in place for as long as possible.  The final bed in the back contains the artichokes, which will stay.

In August, when the garden is fairly empty, filling the beds with tasty cabbages and rutabagas is a no brainer.  But, in March, when many of the winter plants are still producing, it's tough to decide what goes and what stays.  Of course, the ultimate solution is to expand, and you can bet, I'm already trying to figure that one out.